
The Best Way: How To Clean Dog Clippers Like a Pro
The best way to clean dog clippers involves a few simple steps: first, remove hair, then deep clean with a blade wash, disinfect, dry completely, and finally, oil the blades. This keeps your clippers sharp and safe for your dog. Cleaning dog clippers is not just about keeping them working well. It is also about keeping your pet safe from skin problems and infections. Clean clippers cut better and last longer. This guide will show you how to clean your dog clippers like an expert.
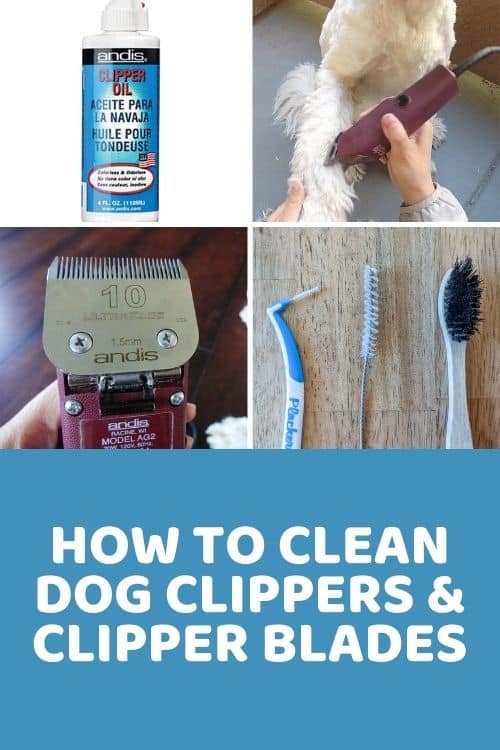
Image Source: doodledoods.com
The Importance of Clean Clippers
Clean clippers are key for many reasons. First, they keep your dog healthy. Dirty blades can carry germs. These germs can cause skin irritation or infections on your pet. Second, clean blades work better. They glide smoothly through fur. This makes grooming easier and faster for you. It is also more comfortable for your dog. Dull or dirty blades can pull hair. This hurts your dog. Third, regular cleaning makes your clippers last longer. Dirt and hair can wear down the motor and blades. This costs you more money in the long run. Good care means your tools stay sharp and useful for many years.
Tools and Supplies You Will Need
Before you start, gather all your cleaning items. Having them ready makes the job easier and faster.
- Small brush or old toothbrush: This helps to get loose hair out of the blades.
- Blade wash for clippers: This liquid cleaner gets rid of dirt and grime on the blades. Some use rubbing alcohol as a quick option.
- Clipper blade oil: This keeps the blades running smoothly and quietly. It also stops rust.
- Clipper coolant spray: This cools down hot blades. It also helps clean and lubricate.
- Soft cloth: Use this to wipe down parts and dry the blades.
- Disinfectant for grooming tools: This kills germs. Make sure it is safe for metal and plastic.
- Gloves: Protect your hands from sharp blades and cleaning liquids.
- Toothpick or small pick tool: Great for getting hair out of tiny spaces.
Step-by-Step Guide to Cleaning Dog Clippers
Cleaning your clippers is a simple process. Follow these steps for best results. This main section covers everything you need to know.
Initial Steps: Safety First
Always put safety first when cleaning tools.
Unplug your clippers from the wall. This stops them from turning on by mistake.
If you just finished grooming, let the blades cool down. Hot blades can cause burns. They also spread oil unevenly.
Always wear gloves. This protects your hands from sharp blades. It also keeps your skin safe from cleaning chemicals.
Stage 1: Removing Hair and Debris
This is the very first step. It is simple but important. You need to get rid of all loose hair. This makes deep cleaning easier.
How to Remove Hair from Clippers
Hair builds up quickly inside and around clipper blades. It makes blades slow down. It also causes them to pull hair. Take out all loose hair.
First, take the blade off the clipper body. Most clippers have a small lever or button to do this. Read your clipper manual if you are unsure. Some blades simply snap on and off. Others slide off. Be gentle. You do not want to bend or break anything.
Once the blade is off, use a small brush. An old toothbrush works well. Brush away all the hair from the blade. Brush from the back of the blade. Push hair out from under the moving parts. Make sure to get hair out of the small gaps.
Next, gently shake the blade. This can dislodge more hidden hair. Tap it on a hard surface. Do this while holding it firmly. More hair might fall out.
For very tiny spots, use a toothpick. You can also use a small pick tool. Push out any hair stuck in tight places. Look closely at the blade teeth. Hair can get stuck there. It stops the blade from cutting well. Also, check the parts where the blade connects to the clipper. Hair often gets packed there. Clean the clipper body too. Use the brush to remove hair from the motor area. Do not let hair build up here. It can make the motor work harder. This causes it to overheat. This step is about getting rid of the big bits. It prepares the blades for a deeper wash.
Stage 2: Deep Cleaning the Blades
After removing the loose hair, it is time to clean the blades deeply. This gets rid of grime and tiny dirt particles.
Choosing Your Blade Wash
A good blade wash is made for clippers. It cleans and often helps to lubricate. It also removes grease.
Most blade washes come in a small tray or jar. You can dip your blades into them.
Some people use rubbing alcohol (isopropyl alcohol) as a quick blade wash. Alcohol works well to clean and evaporate quickly. But it can dry out the metal over time. Always follow up with oil if you use alcohol. Never use harsh cleaners like bleach or strong detergents. These can damage the blades. They can also harm your pet.
To use blade wash, pour a little into a shallow dish. A small, flat container works best. It needs to be just deep enough to cover the blade teeth.
Turn your clippers on. Hold the blade end in the liquid. Let the blades run for about 10-15 seconds. The moving blades will pull the liquid through. This cleans out grime and dirt. You will see dirt come off the blades into the liquid. It is okay if the liquid changes color. This means it is working.
After dipping, turn off the clippers. Take the blade out of the liquid. Wipe the blade clean with a soft cloth. Make sure no liquid remains. Wipe all parts of the blade. Get into the small spaces. Look for any leftover dirt or hair. Repeat if needed. Some blades are best cleaned by hand. Take the blade apart if possible. Use a small brush with blade wash. Scrub the parts gently. Then wipe them clean.
Cleaning Ceramic Blades
Many modern clippers have ceramic blades. These blades are popular because they stay cooler. They also stay sharper longer than steel blades. But they need special care.
Do not drop ceramic blades. They can chip or break easily. Treat them gently.
When cleaning ceramic blades, avoid harsh chemicals. A good blade wash made for clippers is best. Or use rubbing alcohol. Make sure it is not too strong.
You can dip ceramic blades in blade wash just like metal ones. Run the clipper with the blade in the liquid. Let it clean for a few seconds.
After washing, wipe the ceramic blade very well. Use a soft, clean cloth. Make sure it is completely dry. Any water left on the ceramic part can cause issues. It can also lead to rust on the metal parts of the blade.
Never scrub ceramic blades with abrasive sponges. These can scratch the surface. A soft brush or cloth is all you need. Handle ceramic blades with care. Their smooth surface helps them cut well. You want to keep that surface intact. Proper cleaning keeps them working like new.
Stage 3: Disinfecting and Sanitizing
Cleaning removes dirt. Disinfecting kills germs. This step is vital for your pet’s health.
Disinfecting Grooming Tools
Germs can live on clipper blades. These germs can pass from one pet to another. They can also pass from the clipper to your pet’s skin. This can cause skin problems or infections. Disinfecting grooming tools is a must.
After cleaning the blades, spray them with a special disinfectant. Look for products made for grooming tools. Barbicide is a common choice. It kills a wide range of germs. Many sprays are also available. Read the product label. Make sure it says it is safe for clippers.
Spray the disinfectant onto the blades. Cover all surfaces of the blade. Pay extra attention to the teeth. Let it sit for the time listed on the product. This “contact time” is important. It allows the disinfectant to work. It might be a few minutes. Do not rinse it off too soon.
After the contact time, wipe the blades dry with a clean cloth. Make sure no liquid stays on the blade. You want them very dry before oiling. Some disinfectants evaporate quickly. Others need wiping.
It is important to disinfect all parts that touch the pet. This includes combs, brushes, and scissors. Make this part of your regular cleaning plan.
Sanitizing Pet Grooming Equipment
Sanitizing goes hand in hand with disinfecting. It means lowering the number of germs to a safe level. This is crucial for your pet’s health.
Think about all your grooming gear. Clippers are just one part. Combs, brushes, and even the grooming table should be clean.
For clippers, sanitizing means more than just a quick wipe. It means using a proper disinfectant every time after use. Especially if you groom different pets. Or if your pet has skin issues.
Keep your cleaning area clean too. Do not put clean blades on a dirty surface. Use fresh cloths for drying. Store clean tools in a clean, dry place.
By sanitizing all your pet grooming equipment, you prevent the spread of bacteria. You also stop fungus and viruses. This keeps your pet healthy and happy. It is a sign of professional clipper care. Your pet deserves a clean and safe grooming experience.
Stage 4: Drying and Lubricating
After cleaning and disinfecting, your blades need to be completely dry. Then, they need oil. This step is super important.
Thorough drying prevents rust. It also makes sure the oil sticks to the blades.
Use a clean, dry cloth. Wipe all parts of the blade. Make sure no water or cleaning liquid is left. You can also let the blades air dry. Place them on a clean towel. Let them sit for a few minutes. Make sure they are totally dry. Even a tiny bit of moisture can cause rust. Rust will ruin your blades. It also makes them cut poorly.
Applying Clipper Blade Oil
Oiling is the most important part of clipper grooming clipper maintenance. It keeps the blades working well. It also extends their life.
Clipper blade oil is a special light oil. It reduces friction. It stops heat build-up. It also helps the blades glide smoothly.
To apply oil, put a few drops on the blade. Hold the blade so the teeth face down. Put one drop on each side of the blade. Put one drop in the middle of the cutting teeth. You want the oil to spread evenly.
Turn your clippers on. Let them run for about 10-15 seconds. This helps the oil spread over the moving parts. The oil will work its way into the blade’s tiny spaces. You might see some oil spray off. This is normal.
After the oil spreads, turn off the clippers. Use a clean, soft cloth to wipe off any excess oil. Too much oil can attract hair and dirt. It can also build up. Just a thin layer is needed.
Oiling your blades before and after each use is a good rule. If you do a very long grooming session, oil them during the session too. Blades that feel warm need more oil. Blades that make a loud noise need more oil. Proper oiling makes the blades run cool. It also makes them last longer. It makes grooming much more pleasant for your dog.
Stage 5: Preventing Rust and Storing
The last steps in cleaning are about long-term care. You want to stop rust. You also want to store your clippers correctly.
Preventing Clipper Rust
Rust is the enemy of clipper blades. It makes them dull. It also makes them pull hair. Rust can make blades useless.
The best way to prevent clipper rust is to make sure your blades are always dry. After washing, use a clean cloth. Wipe every part of the blade. Leave no wet spots. If you use water to clean, dry them instantly.
Oiling your blades also helps prevent rust. The oil creates a barrier. It stops moisture from getting to the metal. Oil them regularly. This is especially true if you live in a humid place.
Store your blades in a dry spot. Do not leave them in a bathroom. Bathrooms are often damp. A tool box or a drawer is fine. Make sure it is not too hot or too cold. Extreme temperatures can also be bad for your clippers.
If you see any rust, try to remove it right away. A very fine steel wool can sometimes work on light rust. But it is best to stop rust before it starts. Proper cleaning and oiling are your best defense.
Store your clippers in a safe place. Keep them in their original case if you have one. Or use a clipper bag. This protects them from dust. It also stops them from getting knocked around. Store blades separately if they came that way. Store them flat. This keeps the teeth from getting bent. A clean, dry place is always best. This final step completes your professional clipper care routine.
Regular Grooming Clipper Maintenance
Cleaning your clippers is not a one-time thing. It is a part of regular grooming clipper maintenance. A routine keeps your tools sharp. It also keeps your dog safe.
After each use, do a quick clean. This includes removing hair. Then, spray with coolant spray. And apply clipper blade oil. This quick clean keeps the blades ready for next time.
Every few uses, do a deeper clean. This means taking the blades off. Use blade wash. Disinfect. Dry completely. Then oil heavily. This removes more stubborn grime.
Once a month, do a very thorough cleaning. Take blades apart if they come apart. Clean every piece. Check screws. Make sure they are tight. This full check keeps everything in good working order.
Professional Clipper Care
Sometimes, your clippers need more than just cleaning. They might need professional help.
If your clippers start pulling hair, even after oiling, they might be dull. Dull blades cannot be fixed by cleaning. They need to be sharpened. A professional sharpener can do this.
If your clippers make strange noises, the motor might need checking. If they overheat fast, even with coolant, something might be wrong inside.
A professional clipper care service can clean parts you cannot reach. They can fix motors. They can replace worn parts. They can sharpen blades. They know how to care for different clipper types.
Think about sending your clippers for service once a year. This is especially true if you groom often. This helps them last longer. It also makes sure they always cut perfectly. It is an investment in your grooming tools.
Troubleshooting Common Clipper Issues
Even with good care, you might run into problems. Here are some common issues and how to fix them.
- Blades getting hot: This is a common issue. It usually means the blades need more oil. Or they are working too hard. Apply more clipper blade oil. Use a clipper coolant spray. This spray instantly cools the blades. It also helps clean them. If blades still get hot, they might be dull. Dull blades create more friction. They need sharpening.
- Blades pulling hair: This is often a sign of dull blades. Or it could be that hair is stuck. First, clean the blades well. Remove all hair. Then oil them. If they still pull, they likely need sharpening. Sometimes, the blade tension is wrong. Check your clipper manual.
- Blades becoming dull: Over time, all blades get dull. Even with the best care. You will notice they do not cut as cleanly. They might snag hair. Or they leave lines. When this happens, it is time for professional sharpening. Do not try to sharpen them yourself unless you know how. You can ruin them.
Cleaning Schedule at a Glance
Here is a simple table to help you remember your clipper cleaning tasks.
| Frequency | Action | Tools Needed |
|---|---|---|
| After each use | Remove hair, apply coolant, oil blades | Brush, clipper coolant spray, clipper blade oil |
| Every few uses | Deep clean blades (blade wash), disinfect | Blade wash, disinfectant, soft cloth, brush, oil |
| Monthly | Full inspection, deep clean, oil heavily | All tools, screwdriver (for loose screws) |
| Annually (or as needed) | Professional sharpening/service | Professional clipper care service |
Frequently Asked Questions (FAQ)
How often should I clean my dog clippers?
You should do a quick clean after every use. This means removing hair, using coolant, and oiling. A deeper clean with blade wash and disinfectant should happen every few grooming sessions, or at least once a month.
Can I use rubbing alcohol to clean dog clippers?
Yes, you can use rubbing alcohol (isopropyl alcohol) as a blade cleaner. It helps remove dirt and evaporates quickly. However, it can dry out the metal over time. Always follow up with clipper blade oil immediately after using alcohol to prevent rusting and keep blades lubricated.
What happens if I don’t clean my dog clippers?
If you do not clean your clippers, several problems can happen. Blades will become dull faster. They will pull your dog’s hair, causing pain. The motor can overheat. The clippers can rust. And, most importantly, dirty blades can spread germs, leading to skin infections or irritation for your dog.
How do I know when my clipper blades are dull?
Dull clipper blades will not cut smoothly. They will pull or snag your dog’s hair instead of cutting it cleanly. You might hear a different sound, or the clippers might feel like they are dragging. They may also leave uneven lines or skip spots on your dog’s coat.
Is professional clipper care necessary?
Yes, professional clipper care is very helpful, especially if you groom often. Professionals can sharpen blades that have become dull. They can also service the clipper motor, fix internal issues, and replace worn parts. This helps your clippers last longer and work better than if you only do home maintenance. It is a good idea to get them professionally serviced once a year, or if you notice ongoing problems.
Conclusion
Cleaning your dog clippers like a pro is easy. It just takes a little time and the right steps. Regular cleaning keeps your tools sharp. It makes them last longer. Most importantly, it keeps your beloved pet safe and comfortable. Make cleaning a part of your routine. Your dog and your clippers will thank you for it. Start today and enjoy better grooming sessions.