
Image Source: rubnrestore.com
DIY Fix: How To Repair Dog Scratches On Leather Couch Safely
Dogs are part of the family. They bring joy and comfort. But sometimes, they also bring scratches to your nice leather couch. Can you fix these marks? Yes, you often can! Many light to medium dog scratches on leather furniture are fixable at home. This guide will show you how to repair dog scratches on leather couch safely, helping you restore your sofa to its former glory without a costly trip to a professional. You can achieve great results with simple steps and the right tools. We will cover everything from fixing small scrapes to dealing with deeper pet claw marks leather damage. We will also talk about how to hide dog scratches on sofa surfaces effectively.
Why Dogs Scratch Leather Furniture
Dogs scratch leather for many reasons. It is often a natural behavior. They might feel anxious. They might need to trim their nails. Or they might just be playing. Some dogs scratch to mark their territory. Others do it when they get too excited. Puppies chew and scratch as they explore their world. Older dogs might scratch if they are bored. They need things to do. They need toys to play with. This keeps their paws busy. Sometimes, a dog might scratch if they want attention. They learn that scratching gets a reaction from you. Knowing why your dog scratches helps you prevent future damage. It is an important first step.
Getting Ready for Repair
Before you start any repair, you must prepare. This makes sure your work goes well. It also keeps your couch safe.
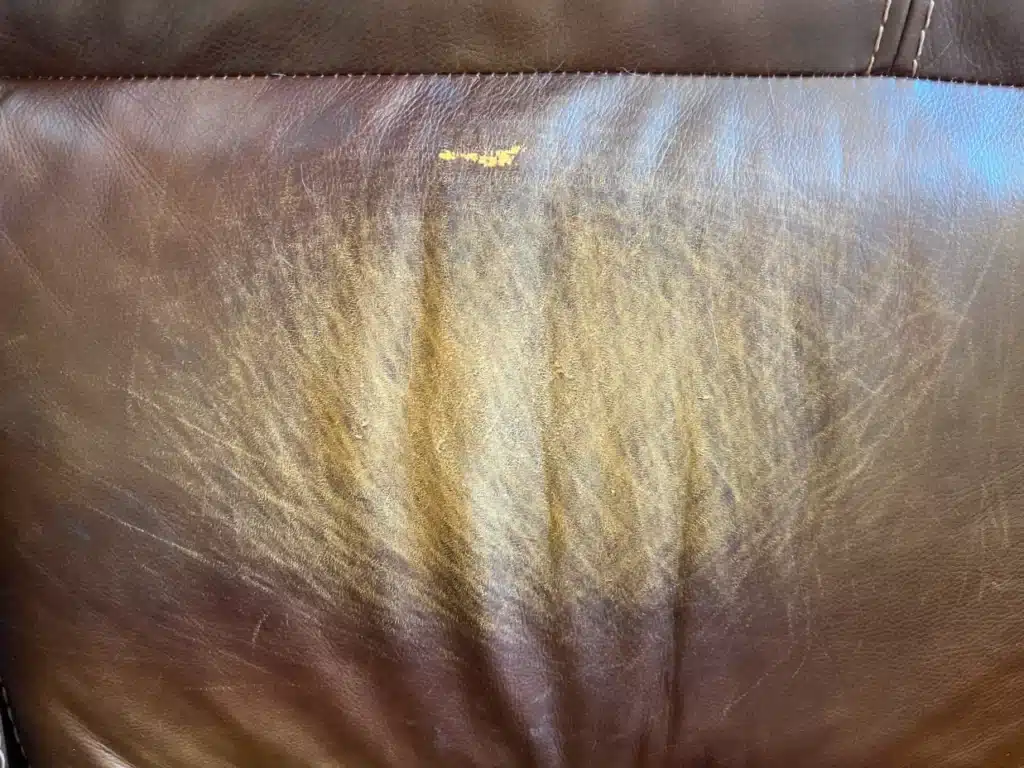
Checking Your Couch
First, look closely at the scratches. Are they light surface marks? Or are they deep gouges? Do you see tears in the leather? The type of damage tells you how to fix it. Small scratches might only need a quick buff. Deeper marks might need a special filler. Tears need more work.
Knowing Your Leather Type
This step is very important. Not all leather is the same. Different types of leather need different repair methods. Using the wrong product can make things worse.
Common Leather Types:
- Pigmented or Protected Leather: This leather has a special coating. The coating protects it. It is very durable. Most couches are made from this type. It is easy to clean. It resists stains. Scratches usually only affect the top coat. This makes them easier to fix.
- Aniline Leather: This leather is very soft. It looks natural. It does not have a thick coating. This means it absorbs liquids easily. It stains easily. It also scratches easily. Aniline leather scratch repair needs special care. You must be gentle. You should use products made just for aniline leather.
- Semi-Aniline Leather: This leather is between the two. It has a light coating. It feels soft. It is more protected than aniline. It is less protected than pigmented leather.
- Bonded Leather: This leather is made from leather scraps. They are glued together. Then a fake leather top is added. It is less durable. It can peel over time. It is very hard to repair bonded leather well. Sometimes, replacing a panel is the only good fix.
- Bicast Leather: This leather has a thick coating of polyurethane. It looks shiny. It is durable, but can crack.
To check your leather type, find a hidden spot. Put a small drop of water on it.
* If the water soaks in fast and darkens the spot, you likely have aniline leather.
* If the water stays on top, you have pigmented or semi-aniline leather.
* If the surface looks fake or peels easily, it might be bonded or bicast leather.
Knowing your leather type helps you choose the right repair products. It is key to successful DIY leather couch restoration.
Gather Your Tools and Materials
Having everything ready saves time. It makes the job easier. A good leather scratch repair kit will have many of these items.
- Cleaning Supplies:
- Soft cloths (microfiber works well)
- Mild leather cleaner (do not use harsh chemicals)
- Distilled water
- Repairing Small Scratches:
- Leather conditioner or leather oil
- Rubbing alcohol (for tough marks on protected leather)
- Cotton swabs
- Repairing Deeper Scratches and Scuffs:
- Fine-grit sandpaper (600-800 grit)
- Leather filler or best leather scratch filler (for larger indentations)
- Spreading tool or spatula (small plastic ones are best)
- Color Matching and Finishing:
- Leather dye for scratches (matching your couch color)
- Applicator sponges or soft brushes
- Leather sealant or top coat
- Safety Gear:
- Gloves (disposable ones are good)
- Mask (if working with strong fumes)
Remember, for severe damage like repair torn leather furniture, you might need more specialized tools or even professional help.
Step-by-Step Repair Guide
Now, let’s get to fixing those scratches. We will start with small marks and move to bigger problems. Always work in a well-lit area.
Fixing Minor Surface Scratches and Scuffs
These are the easiest to fix. They look like light lines or discoloration on the surface.
-
Clean the Area:
- Take a soft cloth. Dampen it with distilled water.
- Gently wipe the scratched area. Remove any dirt or dust.
- Use a mild leather cleaner if needed. Apply a small amount to the cloth. Wipe the area.
- Let the leather dry completely. This is very important.
-
Apply Leather Conditioner or Oil:
- Put a small amount of leather conditioner or special leather oil on a clean, soft cloth.
- Rub the conditioner into the scratch. Use small, circular motions.
- Apply gentle pressure. The friction and oil help to blend the scratch. They push the fibers back together.
- Keep rubbing until the scratch becomes less visible. You might need to do this for a few minutes.
- For light marks on pigmented leather, this often works like magic. The oil helps moisturize the leather. It makes the scratch disappear.
-
Buff Gently:
- Use a separate clean, dry cloth.
- Buff the treated area. This removes any excess conditioner. It also brings back the natural shine.
- Check your work. If the scratch is still there, you can repeat the steps.
Repairing Deeper Scratches and Scuffs
These scratches are deeper. You can feel them with your fingernail. They might have removed some color. They often look white or lighter than the couch.
-
Clean the Area Thoroughly:
- Just like with minor scratches, clean the spot well.
- Use a mild leather cleaner. Make sure no dirt or grease is left.
- Let it dry fully.
-
Smooth the Edges (Optional, but recommended):
- For raised edges around the scratch, you can lightly sand them.
- Use very fine-grit sandpaper (600-800 grit or higher).
- Gently sand only the edges of the scratch. Do not sand the good leather around it.
- Use light pressure. You are trying to smooth out any rough spots.
- Wipe away any dust with a clean, damp cloth. Let it dry.
-
Apply Leather Filler (if needed):
- If the scratch is deep and leaves a noticeable groove, you will need a best leather scratch filler.
- Apply a very thin layer of the filler. Use a spreading tool or a small plastic spatula.
- Press the filler into the scratch. Make sure it fills the gap.
- Scrape off any excess filler. Make the surface even with the leather.
- Let the filler dry. Drying time varies. Read the product instructions. It might take a few hours.
- You might need to apply several thin layers. Let each layer dry before adding the next. This builds up the filler evenly.
- Once dry, lightly sand the filled area if it is not perfectly smooth. Use very fine sandpaper.
-
Color Matching with Leather Dye for Scratches:
- This is where you hide dog scratches on sofa surfaces effectively.
- Get a leather dye that matches your couch color. Many leather repair kits come with color mixing guides.
- Test the dye in a hidden spot first. A small spot under the cushion is good. Make sure the color is right.
- Apply the dye in thin layers. Use an applicator sponge or a small brush.
- Dab the dye directly onto the scratch or filled area.
- Blend the edges of the dye. Do this by lightly dabbing outwards.
- Let each layer dry before adding another. This prevents blotches. It builds up the color slowly.
- Keep adding layers until the scratch is fully covered and the color matches the surrounding leather.
-
Apply a Leather Sealant or Top Coat:
- Once the dye is dry and the color is good, apply a leather sealant.
- The sealant protects the repaired area. It makes it durable. It also helps the color stay.
- Apply a thin, even layer of sealant. Use an applicator or sponge.
- Let it dry fully. This might take 24 hours. Check the product instructions.
- You might want to apply a second thin coat for extra protection.
Repairing Tears and Holes
Repairing torn leather furniture is harder. It needs more care. These are bigger jobs.
-
Clean the Area:
- Clean around the tear. Use mild leather cleaner.
- Make sure the area is clean and dry.
-
Prepare the Tear:
- If there are ragged edges, trim them carefully. Make the edges as neat as possible.
- For larger tears, you might need a sub-patch. This is a piece of fabric. It goes under the leather. It gives the repair strength.
- Slip the sub-patch under the tear. Use tweezers to move it into place. Make sure it is larger than the tear itself.
- Glue the sub-patch to the underside of the leather. Use special leather adhesive. Press it firmly. Let it dry.
-
Apply Leather Filler (for larger gaps):
- Once the sub-patch is secure, apply leather filler.
- Use a spatula. Fill the tear or hole.
- Apply thin layers. Build it up slowly. Let each layer dry completely.
- Smooth the filler. Make it level with the surrounding leather.
- You might need to lightly sand after drying. Use very fine sandpaper.
-
Re-texturing (Optional):
- Some repair kits have a grain paper. This helps match the leather texture.
- Place the grain paper over the wet last layer of filler. Press it down.
- Let it dry. Then remove the paper. This transfers the leather pattern.
-
Color Matching and Sealing:
- Just like with deep scratches, apply leather dye.
- Layer the dye until the color matches.
- Finish with a leather sealant. This protects your hard work.
Special Notes for Aniline Leather Scratch Repair
Aniline leather is delicate. It needs special handling.
- No Sanding: Do not sand aniline leather. It will damage the natural surface.
- Special Cleaners: Use only cleaners made for aniline leather. They are gentle.
- Less Filler: Use very little to no filler. Aniline leather is meant to feel natural. Too much filler will make it stiff.
- Aniline-Specific Dyes: Use dyes made for aniline leather. These dyes soak in. They do not sit on top. They keep the soft feel of the leather.
- Condition Often: Aniline leather dries out. Condition it often. This helps prevent future cracks. It also keeps the leather soft.
If you are unsure about aniline leather scratch repair, it might be best to ask a professional. Their experience can save your delicate couch.
When to Consider Professional Help
While DIY leather couch restoration can save money, some damage is too much for a home repair.
Signs You Need a Professional:
- Very Large Tears: If the tear is bigger than a few inches, it is often hard to fix perfectly at home.
- Extensive Discoloration: If a large area of your couch has lost color, a professional can re-dye it evenly.
- Complex Leather Types: Some exotic leathers need special care. Bonded leather is often better replaced by a pro.
- Structural Damage: If the leather is ripped all the way through and the padding is showing, a professional can re-stitch or patch it properly.
- Failed DIY Attempts: If you tried to fix it and it did not work, do not make it worse. Call a pro.
- Valuable Furniture: If your couch is expensive or an antique, a professional repair protects its value.
Professional Leather Repair Cost
The cost of professional leather repair varies. It depends on the damage. It also depends on your location. And it depends on the professional’s skill.
* Minor Scratches: Might cost $100-$300.
* Deeper Scratches or Small Tears: Could be $200-$500.
* Large Tears or Re-dyeing a Section: Might range from $400 to $1000 or more.
* Full Couch Restoration: This can cost over $1000. It can be a big job.
Ask for quotes from a few different repair services. Make sure they specialize in leather. Ask to see examples of their work. While professional leather repair cost can be high, it might be worth it for a beloved piece of furniture.
Prevention is Key: Stop Future Scratches
The best repair is one you do not have to make. Learning to prevent dog scratches on leather can save you a lot of trouble.
Trimming Your Dog’s Nails
This is the simplest and most effective step.
* Regular Trims: Keep your dog’s nails short. Trim them every 2-4 weeks.
* Proper Tools: Use good quality nail clippers or a dremel tool.
* Start Early: Get your dog used to nail trims when they are young.
* Professional Help: If you are nervous, ask a vet or groomer to do it. Short nails mean fewer deep scratches.
Training and Behavior Tips
Train your dog to stay off the couch. Or teach them to use a specific spot.
* Provide Alternatives: Give your dog a comfy dog bed. Put it near your couch. This gives them their own space.
* Use Commands: Teach “off” or “place.” Reward them when they obey.
* Consistency: Everyone in the house must follow the same rules.
* Positive Reinforcement: Reward good behavior. Never punish scratching directly. Instead, redirect them to a scratching post or toy.
* Exercise: A tired dog is a good dog. Make sure your dog gets enough walks and playtime. This helps reduce anxiety and boredom. Boredom often leads to destructive behavior.
Protective Measures
Even with training, accidents happen. Protect your couch.
* Throw Blankets: Use thick, durable blankets. Drape them over areas your dog uses most. These act as a barrier.
* Slipcovers: A slipcover protects the entire couch. You can remove it to wash. It also changes the look of your room.
* Scratch Guards: Some products are clear plastic sheets. They stick to the couch. They prevent claws from reaching the leather.
* Discouraging Sprays: Some sprays have a bitter taste. Dogs do not like it. Spray it on the couch. This might stop them from chewing or scratching. Test it on a hidden spot first. Make sure it does not harm your leather.
By taking these steps, you can greatly reduce the chances of new pet claw marks leather damage.
Maintaining Your Leather Couch
Regular care keeps your leather couch healthy. Healthy leather is more resistant to damage. It also looks better.
- Clean Regularly: Dust your couch weekly. Use a soft, dry cloth.
- Use Leather Cleaner: Every few months, clean your couch. Use a cleaner made for your leather type. This removes oils and dirt.
- Condition Often: Leather can dry out. It can crack. Use a good leather conditioner. Do this every 6-12 months. Conditioner keeps the leather soft and flexible. It helps prevent cracking.
- Avoid Direct Sunlight: Sunlight can dry out leather. It can fade the color. Place your couch away from sunny windows.
- Keep Away from Heat: Radiators and fireplaces dry out leather. Keep your couch a safe distance away.
- Deal with Spills Fast: Wipe up spills right away. Use a clean, dry cloth.
Proper maintenance helps your couch last longer. It makes it less likely to show minor scratches.
Frequently Asked Questions (FAQ)
Can I use olive oil to fix dog scratches on leather?
You can use olive oil for very light scratches. It helps to hydrate the leather and blend the mark. However, it can also leave an oily residue. This residue can attract dirt over time. It might also change the color of the leather. Use a specialized leather conditioner or oil for better and safer results.
How long does DIY leather couch restoration last?
The repair’s life depends on the damage. It also depends on how well you did the repair. Minor fixes might last years. Deeper repairs or tears might need touch-ups over time. Regular use and continued dog activity can wear down the repair. Good maintenance helps it last longer.
Is a leather scratch repair kit worth it?
Yes, a good leather scratch repair kit is often worth the money. Especially for common pigmented leather couches. These kits have the right tools and products. They help you get a better result. They are much cheaper than professional repair. Look for kits that match your leather color. Read reviews to find the best leather scratch filler and dye.
What if my dog keeps scratching the same spot?
This means you need to address your dog’s behavior. First, make sure their nails are short. Then, offer alternatives. Give them a scratching post. Give them new toys. Use deterrents like bitter spray or a slipcover. If the behavior does not stop, talk to a dog trainer or vet. They can help with persistent issues.
Can I fix scratches on faux leather or PU leather?
Faux leather (PU leather) and bonded leather are different from real leather. They often do not repair well. They can peel or crack. You might be able to use a special patch kit. But color matching is hard. And the repair often does not last. Sometimes, replacement is the only good option for fake leather.
Conclusion
Repairing dog scratches on your leather couch is possible. It needs patience and the right steps. From minor scuffs to deeper pet claw marks leather damage, you can make your couch look better. Use a proper leather scratch repair kit. Choose the right leather dye for scratches. Remember to hide dog scratches on sofa surfaces with care. DIY leather couch restoration saves you money. It also gives you a sense of accomplishment.
Always remember to clean the area. Choose the right products for your leather type. Apply thin layers of filler and dye. Let them dry. And, most importantly, take steps to prevent new scratches. Keep your dog’s nails trimmed. Provide good training and alternatives. With these tips, your leather couch can stay a beautiful and comfortable part of your home for years to come.