
Image Source: i.ytimg.com
DIY Guide: How To Get Rid Of Dog Scratches On Car
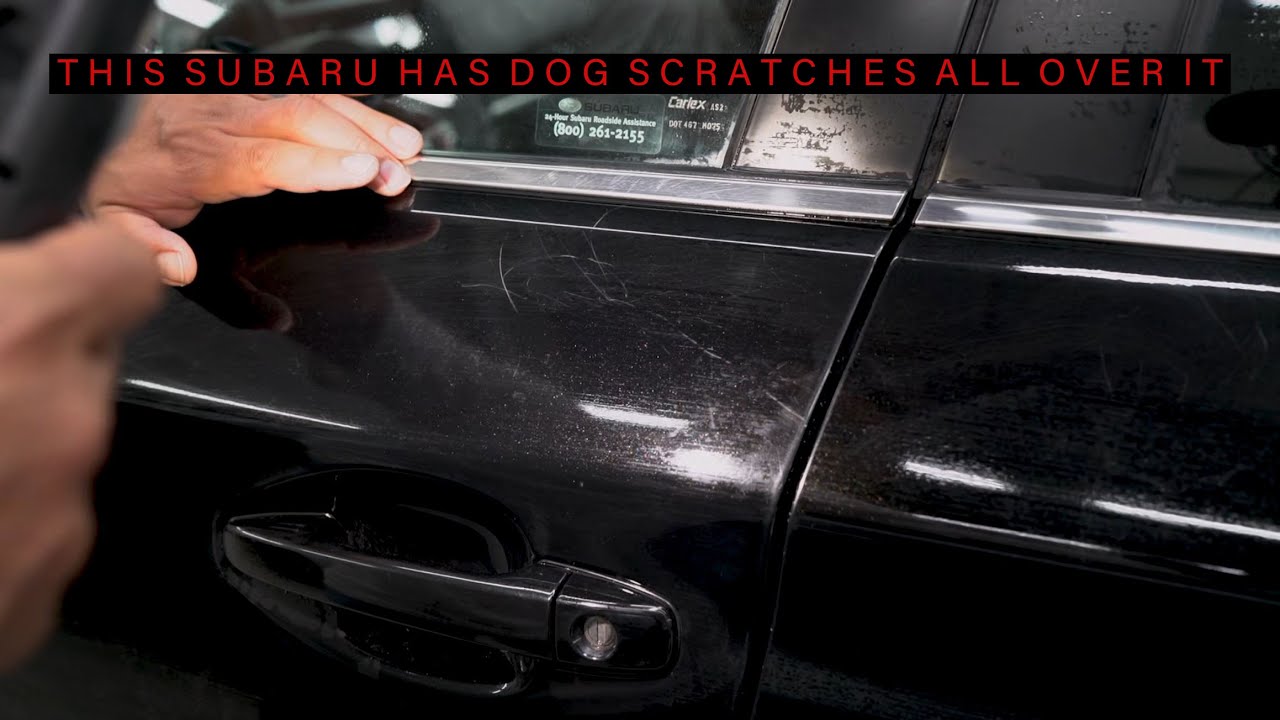
Can you fix dog scratches on your car? Yes, you often can! What is the best way to remove dog nail scratches from your car? It depends on how deep the scratch is. Many common dog paw marks are light and only affect the clear coat, the top layer of your car’s paint. You can often remove these scratches yourself with simple tools and products. This guide will show you how to tackle different types of dog scratches on your car’s paint, from tiny marks to deeper gouges. We will also share tips to help prevent dog scratches on car in the future.
Learning About Car Paint Layers
Before you start any dog nail scratch repair car paint work, it helps to know how your car’s paint is built. This knowledge helps you figure out how deep the scratch goes. It also guides you on what repair steps you need to take.
Your car’s paint is made of several layers. Think of it like a sandwich:
- Clear Coat: This is the very top layer. It is clear and shiny. It protects the color layer below it. Most light
dog paw marks caronly scratch this clear coat. - Base Coat (Color Coat): This layer gives your car its color. It is right under the clear coat. If a scratch goes through the clear coat and into this layer, you will see a different color or a dull mark.
- Primer: This layer is under the base coat. It helps the color stick to the metal. It also protects the metal. Primer is usually gray, white, or red. If you see this color, the scratch is deeper.
- Metal: This is the bare car body. If a scratch goes all the way to this layer, you will see shiny metal. This means the scratch is very deep. These scratches need more serious fixing.
Figuring Out the Scratch Depth
It is very important to know how deep a scratch is. This tells you which repair method to use. A simple test helps you tell. This is often called the “fingernail test.”
The Fingernail Test
- Clean the Area: First, clean the scratch area with soap and water. Dry it well. This helps you see the scratch clearly.
-
Run Your Fingernail: Gently run your fingernail across the scratch.
- If your fingernail does NOT catch: The scratch is likely very light. It is probably only in the clear coat. These are often easy to fix yourself. You might see a white haze or light lines. These are
dog nail scratch repair car paintjobs you can do at home. - If your fingernail catches a little: The scratch is deeper. It has likely gone through the clear coat. It might be into the base coat. These can sometimes be fixed at home. They may need more effort and different products. You might need
rubbing compound for pet scratches on car. - If your fingernail catches a lot: The scratch is very deep. It has likely gone through the clear coat and base coat. It might be down to the primer or even the metal. These scratches are harder to fix yourself. They often need a professional. Fixing these deep
fix dog claw marks on carmarks can be tricky.
- If your fingernail does NOT catch: The scratch is likely very light. It is probably only in the clear coat. These are often easy to fix yourself. You might see a white haze or light lines. These are
Tools and Supplies You Will Need
Having the right tools makes the job easier and better. The exact items depend on how deep the scratch is. Here is a list of common things you might need.
For All Scratch Levels
- Car Wash Soap: A good quality car wash soap.
- Two Buckets: One for soapy water, one for rinse water.
- Microfiber Wash Mitts: Soft mitts to wash the car.
- Microfiber Towels: Soft, clean towels for drying and buffing.
- Rubbing Alcohol or Isopropyl Alcohol (IPA) Prep Spray: For cleaning the area before working on it.
- Painter’s Tape: To tape off areas you are not working on. This protects good paint.
For Light Scratches (Clear Coat Only)
- Fine Car Scratch Remover/Compound: Look for products labeled “scratch remover,” “swirl remover,” or “light cut compound.” Many brands offer a
best car scratch remover dogproduct. - Polishing Pad or Applicator Pad: Soft foam pads for applying the product.
- Car Wax or Sealant: To protect the repaired area.
For Medium Scratches (Through Clear Coat, Into Base Coat)
- Medium Cut Rubbing Compound: Stronger than light scratch removers. This helps
remove deep dog scratches clear coat. - Fine Grit Wet Sandpaper (2000-3000 grit): Use very carefully and only if you know how. This is for leveling out deeper clear coat scratches.
- Sanding Block: To keep sandpaper flat.
- Spray Bottle: For water when wet sanding.
- Touch-Up Paint Kit: If the base coat color is missing. This kit usually has a small brush, color paint, and a clear coat. Make sure it matches your car’s paint code.
For Deep Scratches (To Primer or Metal)
- Touch-Up Paint Kit: As mentioned above, matched to your car’s paint code.
- Primer: If the scratch goes to bare metal.
- Clear Coat: To finish the job.
- Small Paint Brushes or Applicator: For very fine work.
- More Advanced Tools: For these, you might need a machine polisher. But for most
DIY car scratch removal dogjobs, you will want to avoid machine polishers unless you have used one before.
Step-by-Step DIY Car Scratch Repair
This part will guide you through the process. We will cover light, medium, and deep scratches. Remember, patience is key. Do not rush any step.
Repairing Light Scratches (Clear Coat Only)
These are the most common dog paw marks car. They are often the easiest to fix.
Step 1: Clean the Area Very Well
- Wash the Car: Wash the entire car, or at least the affected panel. Use car wash soap and two buckets. This gets rid of all dirt and grime. Dirt can cause more scratches during repair.
- Rinse and Dry: Rinse the car thoroughly. Use clean microfiber towels to dry it completely.
- Alcohol Prep: Spray the scratch area with rubbing alcohol or IPA prep spray. Wipe it with a clean microfiber towel. This removes any wax, grease, or leftover dirt. It makes sure the scratch remover can work its best.
Step 2: Apply Scratch Remover or Compound
- Choose Your Product: Get a good quality
best car scratch remover dog. Make sure it is for light scratches or swirl marks. - Apply to Pad: Put a small amount of the scratch remover onto a foam applicator pad or a clean microfiber towel. A little goes a long way.
- Rub in Small Circles: Gently rub the product onto the scratch. Use small, overlapping circles. Work in a small area at a time (e.g., 6×6 inches).
- Add Light Pressure: Apply light to medium pressure. The goal is to gently rub away the top layer of the clear coat. This smooths out the scratch.
- Check Your Work: After a minute or two of rubbing, wipe off the product with a clean microfiber towel. Check the scratch. Is it gone? Is it less visible?
- Repeat if Needed: If the scratch is still there, apply more product. Repeat the rubbing process. You might need to do this a few times. Do not push too hard. Do not rub for too long in one spot. This can damage the paint more.
Step 3: Polish the Area
Even after the scratch is gone, the area might look a bit dull. This is where polishing comes in. Polishing dog paw marks car restores the shine.
- Use a Polish: Apply a small amount of car polish to a fresh, clean applicator pad. Car polish is finer than scratch remover. It refines the finish.
- Rub Gently: Rub the polish onto the area. Use small, overlapping circles. Use very light pressure.
- Buff to Shine: Wipe off the polish with a clean microfiber towel. Buff the area gently. This will bring back the shine.
Step 4: Apply Wax or Sealant
This final step protects your newly fixed paint. It adds a layer of defense against new scratches and environmental damage.
- Apply Wax: Apply a thin, even coat of car wax or paint sealant to the repaired area. Use a wax applicator pad.
- Let it Haze: Let the wax dry to a haze as the product instructions say.
- Buff Off: Use a clean, dry microfiber towel to gently buff off the wax. The paint should look shiny and smooth.
Repairing Medium Scratches (Through Clear Coat, Into Base Coat)
These scratches are deeper. Your fingernail will catch slightly. They require more careful work, sometimes including rubbing compound for pet scratches on car and very light wet sanding. This is a more involved DIY car scratch removal dog process.
Step 1: Clean the Area Very Well
Just like with light scratches, a clean surface is a must. Wash the car panel. Then clean the scratch area with alcohol prep.
Step 2: Consider Wet Sanding (Use Caution!)
Warning: Wet sanding is risky. If you do it wrong, you can cause more damage. Only do this if you are confident and careful. Start with the least aggressive method first (rubbing compound).
- Tape Off: Use painter’s tape to tape off the immediate area around the scratch. This helps you focus.
- Soak Sandpaper: Soak very fine grit sandpaper (2000-3000 grit) in water for at least 10-15 minutes. This makes it more flexible.
- Keep it Wet: Keep the scratch area and the sandpaper wet with water from a spray bottle.
- Lightly Sand: Place the sandpaper on a foam sanding block. Gently sand the scratch. Use light, straight motions, not circles. Use very little pressure. Sand only for a few seconds at a time.
- Check Progress: After a few passes, wipe the area dry. Check the scratch. You are trying to level the clear coat. You want to see a dull but uniform finish where the scratch was.
- Stop When Level: Stop as soon as the scratch seems to be gone or much less visible. Do not over-sand!
Step 3: Apply Medium Cut Rubbing Compound
This step helps smooth out the sanding marks or removes the scratch if you skipped wet sanding. Rubbing compound for pet scratches on car is stronger than scratch remover. It helps remove deep dog scratches clear coat.
- Apply Compound: Put a small amount of medium cut rubbing compound onto a foam applicator pad.
- Rub Firmly: Rub the compound onto the scratch area. Use small, overlapping circles. Apply firm, but not extreme, pressure. Work in small sections.
- Wipe and Check: After a few minutes, wipe off the compound with a clean microfiber towel. Check the scratch. It should be much less visible or gone. The area might look dull.
- Repeat: If needed, repeat the process.
Step 4: Apply Touch-Up Paint (If Base Coat is Damaged)
If the scratch went through the clear coat and some of the color (base coat) is gone, you might need touch-up paint. This is part of automotive scratch repair from animals.
- Clean Again: Make sure the area is perfectly clean and dry.
- Apply Color: Use the small brush from your touch-up paint kit. Apply a very thin layer of color paint into the scratch. Do not apply too much. You want to fill only the missing paint.
- Dry: Let the first layer dry completely. This might take 30 minutes to a few hours. Check the product instructions.
- Apply More Thin Layers: Apply more thin layers if needed. Let each layer dry. The goal is to build up the color level to just below the original clear coat level.
- Apply Clear Coat: Once the color layers are dry, apply a thin layer of clear coat from your kit. This protects the new paint. Again, let it dry. You might apply 2-3 thin layers of clear coat. Let each dry.
Step 5: Polish the Area
After using rubbing compound or touch-up paint, the area will look dull or slightly raised. Polishing brings back the shine. This is key for car paint restoration after dog damage.
- Use Fine Polish: Apply a small amount of fine car polish to a fresh, clean applicator pad.
- Rub and Buff: Rub the polish onto the area in gentle, overlapping circles. Buff off with a clean microfiber towel until the shine returns. This step helps blend the new paint or smoothed clear coat with the surrounding paint.
Step 6: Apply Wax or Sealant
Protect the repaired spot with wax or sealant.
- Wax On: Apply a thin layer of wax.
- Haze and Buff Off: Let it dry to a haze. Buff off with a clean microfiber towel for a glossy finish.
Fixing Deep Scratches (To Primer or Metal)
If your dog’s claws have dug deep, exposing primer or metal, these are serious fix dog claw marks on car. While you can try to fix them yourself, it is often best to get help from a professional. This is especially true if the scratch is large or in a very visible spot. A professional can offer proper automotive scratch repair from animals and better car paint restoration after dog damage.
DIY for Deep Scratches (If You Insist)
If you still want to try DIY, this is the most involved method. The results may not be perfect.
Step 1: Clean and Prep
Clean the area very well, just like for other scratch types. Use rubbing alcohol.
Step 2: Apply Primer (If Metal is Showing)
- Sand Lightly: If there are rough edges, you can very lightly sand with 2000-grit wet sandpaper to smooth them. Clean thoroughly.
- Apply Primer: If bare metal is showing, you must apply primer. Use a touch-up primer from your paint kit. Apply a very thin coat directly into the scratch.
- Dry: Let the primer dry completely. Follow product instructions. This might take several hours.
Step 3: Apply Base Coat (Color)
- Apply Thin Layers: Once the primer is dry, apply thin layers of your car’s matching base coat color. Use the small brush. Build up the layers slowly.
- Dry Between Coats: Let each layer dry completely before adding the next. This helps prevent drips and unevenness.
- Build Up: Continue applying thin layers until the color is level with the surrounding original paint.
Step 4: Apply Clear Coat
- Apply Thin Layers: Once the base coat is dry, apply thin layers of clear coat. This protects the new paint and gives it shine.
- Dry Between Coats: Let each clear coat layer dry.
- Build Up: Apply enough clear coat layers to be slightly higher than the surrounding paint. This is important for the next step.
Step 5: Wet Sand the New Clear Coat (Advanced!)
This step is only for the very skilled. It levels the new clear coat with the old one.
- Soak Sandpaper: Use 2000-3000 grit wet sandpaper. Soak it.
- Gently Sand: Very, very gently wet sand the raised clear coat. Use a sanding block. Use light pressure. Sand in small areas.
- Check Often: Wipe and check often. Stop as soon as the area is level. You are trying to remove the slight bump of new clear coat.
Step 6: Polish and Wax
After wet sanding, the area will be dull.
- Medium Compound: Use a medium cut rubbing compound to remove the sanding marks.
- Fine Polish: Follow with a fine polish to bring back the shine.
- Wax: Finish with car wax or sealant for protection.
Table: Scratch Type and Recommended Solution
This table summarizes the different scratch types and the best ways to tackle them.
| Scratch Depth | Description | Fingernail Test | Recommended DIY Solution | Notes |
|---|---|---|---|---|
| Light Scratch | Only in the clear coat. | Does NOT catch | Car Scratch Remover/Compound, Polish, Wax | Easiest to fix. Focus on cleaning and gentle rubbing. |
| Medium Scratch | Through clear coat, into base coat. | Catches a little | Rubbing Compound, (Optional: Fine Wet Sanding), Polish, Wax | More effort needed. Consider touch-up paint if color is missing. Wet sanding needs great care. |
| Deep Scratch | Through base coat, to primer or bare metal. | Catches a lot | Touch-Up Paint Kit (Primer, Color, Clear Coat), Wet Sanding (Advanced), Polish, Wax | Hardest to fix yourself. Results may vary. Often best to consult a professional for proper car paint restoration after dog damage. |
Table: Common Products for DIY Scratch Repair
Here are some types of products you might look for.
| Product Type | Purpose | Examples (General Categories) |
|---|---|---|
| Car Wash Soap | Basic cleaning before any work. | pH-neutral car soaps (e.g., Meguiar’s Gold Class, Chemical Guys Mr. Pink) |
| IPA Prep Spray | Removes wax, grease, contaminants. | Isopropyl Alcohol (IPA) solution (70% or higher), specialized paint prep sprays (e.g., Gtechniq Panel Wipe) |
| Light Scratch Remover | For very light clear coat scratches/swirls. | Meguiar’s ScratchX 2.0, Turtle Wax Scratch Repair & Renew, Chemical Guys VSS Scratch & Swirl Remover |
| Medium Cut Rubbing Compound | For deeper clear coat scratches, oxidation. | Meguiar’s Ultimate Compound, Mothers Scratch Remover, 3M Rubbing Compound |
| Fine Car Polish | Refines surface, adds gloss after compounding. | Meguiar’s Ultimate Polish, Mothers Pure Polish, Chemical Guys V36 Optical Grade Finishing Polish |
| Car Wax/Sealant | Protects paint, adds shine. | Carnauba waxes (e.g., Collinite 845), synthetic sealants (e.g., Meguiar’s Ultimate Liquid Wax, Chemical Guys Butter Wet Wax), ceramic sprays (e.g., Meguiar’s Ceramic Wax) |
| Touch-Up Paint Kit | For deep scratches needing color/primer fill. | Dealer-specific kits, online auto paint retailers (matched by VIN/paint code) |
| Fine Grit Wet Sandpaper | To level clear coat (use with extreme care). | 2000-3000 grit (e.g., 3M Wetordry Sandpaper) |
| Microfiber Towels/Pads | For applying products and buffing. | High-quality, soft microfiber towels, foam applicator pads |
Ways to Prevent Dog Scratches on Car
The best fix is to stop scratches from happening in the first place. Here are simple steps to help prevent dog scratches on car.
1. Keep Your Dog’s Nails Trimmed
This is the most important step. Long dog nails are sharp. They can easily scratch paint.
- Regular Trimming: Trim your dog’s nails often. How often depends on your dog. Some need it every 2-4 weeks.
- Grinding: Many people use a Dremel tool or a special nail grinder. This smooths the nail edges. It makes them less likely to scratch.
- Professional Groomer: If you are not comfortable trimming nails, take your dog to a professional groomer or vet.
2. Use Protective Barriers
Put something between your dog and your car’s paint.
- Seat Covers: If your dog rides inside the car, use a sturdy car seat cover. Look for waterproof and scratch-resistant ones.
- Cargo Liners: For dogs in the cargo area, use a tough cargo liner. This protects the floor and side panels.
- Paw Covers/Boots: For short trips or specific events, consider dog boots or paw covers. Make sure they fit well and your dog is comfortable wearing them.
- Door Guards: Some products stick to the inside of car doors. They protect the door panel from paw marks.
- Car Paint Protection: Apply a good quality wax, sealant, or ceramic coating to your car’s paint. These layers add some defense. They make scratches less likely to reach the clear coat. They also make
polishing dog paw marks careasier if a scratch does happen.
3. Train Your Dog
Good behavior training can reduce scratches.
- “Wait” Command: Teach your dog to wait before jumping into or out of the car. This stops them from scratching as they scramble.
- “Off” Command: If your dog tends to put paws on the car body (e.g., looking in windows), teach them “off.”
- Positive Reinforcement: Reward calm behavior around the car.
4. Mind the Entering and Exiting
Pay attention when your dog gets in and out of the car.
- Lift Small Dogs: If your dog is small enough, gently lift them in and out. This stops them from jumping and scratching.
- Ramps or Steps: For larger dogs, a dog ramp or portable steps can be very helpful. These let your dog walk into the car instead of jumping. This reduces pressure on their joints and protects your car.
- Controlled Entry: Open the door only wide enough for them to get in. Guide them gently. Do not let them scramble.
5. Clean Off Mud and Debris
If your dog has muddy paws, clean them before they get in the car. Mud and small stones stuck to paws can cause scratches even with trimmed nails. Keep a towel in your car for this.
6. Be Aware of Where Your Dog Plays
If your dog plays fetch or runs near your car, they might accidentally brush against it. Try to steer playtime away from the car.
By taking these steps, you can greatly reduce the chances of getting automotive scratch repair from animals done in the future. Prevention is always easier than repair.
Crucial Tips and Warnings
Doing DIY car scratch removal dog can save you money. But you must be careful.
- Always Test First: Before using any product on a scratch, test it on a hidden part of your car. This could be a lower part of a door or inside the trunk lid. Make sure it does not damage the paint or cause discoloration.
- Work in the Shade: Always work on your car in a cool, shady spot. Direct sunlight can make products dry too fast. This can leave streaks or make them harder to buff off.
- Use Clean Microfiber Towels: Always use fresh, clean, high-quality microfiber towels. Dirty or cheap towels can scratch the paint. Fold your towel often to use a clean section.
- Less is More: Start with a small amount of product. You can always add more if needed. Using too much can make a mess and waste product.
- Apply Light Pressure: When rubbing or polishing, use light to medium pressure. Too much pressure, especially with compounds, can burn through the clear coat.
- Patience is Key: Do not rush the process. Take your time with each step. Good results come from careful work.
- Know When to Stop: If a scratch is not coming out with gentle methods, do not keep trying harder. You might do more harm than good.
- When to Call a Professional: If the scratch is very deep (showing metal or primer), very large, or you are not comfortable doing the repair, call a professional detailer or body shop. They have special tools and skills for
car paint restoration after dog damagethat you might not have at home. They can achieve flawless results.
By following these tips, you can increase your chances of a successful dog nail scratch repair car paint job.
Frequently Asked Questions (FAQ)
Q: Can dog scratches really be removed from car paint at home?
A: Yes, many dog scratches can be removed at home. Light scratches in the clear coat are often quite easy to fix with scratch remover and polish. Deeper scratches are harder but can sometimes be improved with touch-up paint.
Q: What is the best car scratch remover dog?
A: There isn’t one “best” product for all dog scratches. For light clear coat scratches, look for products like Meguiar’s ScratchX 2.0 or Turtle Wax Scratch Repair & Renew. For deeper clear coat scratches, a medium cut rubbing compound like Meguiar’s Ultimate Compound works well. Always read reviews and choose a product that matches the depth of your scratch.
Q: Will rubbing compound for pet scratches on car hurt my car’s paint?
A: Rubbing compound can be safe if used correctly. It is designed to remove a very thin layer of clear coat to level out scratches. However, using too much pressure, rubbing for too long, or using a too aggressive compound can thin the clear coat too much or even burn through it. Always use with care and follow instructions.
Q: How can I remove deep dog scratches clear coat without repainting?
A: For deep scratches that only go through the clear coat (not into the color), you might use a medium cut rubbing compound or very fine wet sanding (2000-3000 grit) followed by polishing. If the scratch has gone into the color layer, you will likely need touch-up paint to fill the missing color before polishing. If it’s very deep, professional help might be needed.
Q: Is it safe to polish dog paw marks car with a machine polisher?
A: For beginners, it’s safer to polish dog paw marks by hand. Machine polishers can remove paint very quickly. If you are not experienced, you can cause more damage, like burning through the clear coat. If you are comfortable with a machine, use a dual-action (DA) polisher with a low speed and appropriate pad and polish.
Q: How can I prevent dog scratches on car effectively?
A: The best ways to prevent dog scratches are regular nail trimming, using protective barriers like car seat covers or door guards, training your dog to be calm around the car, and using a ramp for large dogs. Keeping paws clean before car rides also helps.
Q: When should I take my car to a professional for automotive scratch repair from animals?
A: You should see a professional if the scratch is very deep (down to the primer or metal), very long or wide, or if you are not comfortable doing the repair yourself. Professionals can achieve a seamless car paint restoration after dog damage that might be hard to get at home.
Q: Can a scratch pen fix dog scratches?
A: Scratch pens are generally for very, very light scratches or chips. For dog scratches, which are often linear and can be slightly deeper, a scratch pen might not provide a good, lasting fix. They can also leave a raised line of clear coat that looks obvious. Compounds and polishes generally give better results for typical dog scratches.