
Image Source: i.ytimg.com
How To Get Dog Scratches Out Of Car: Easy DIY Removal Tips
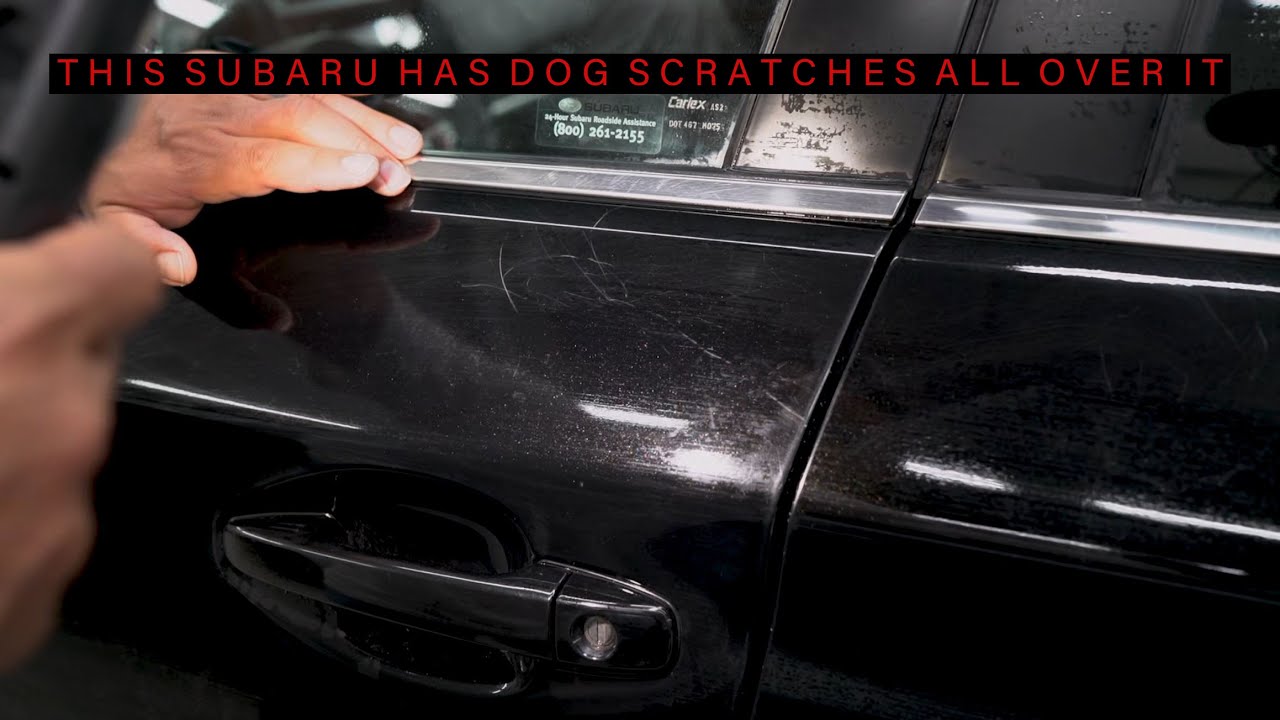
Yes, you can often get dog scratches out of your car. For many minor marks, you can do it yourself at home. Deeper scratches might need a pro. This guide will show you easy steps for DIY dog claw marks car paint removal. We will cover what you need and how to fix common marks.
Grasping Different Types of Scratches
Before you start, you need to know what kind of scratch you have. Not all scratches are the same. Dogs can make many kinds of marks on your car. Some are just on the top layer. Others go much deeper. Knowing the type helps you pick the right fix.
The Car Paint Layers
Your car’s paint is not just one layer. It has a few layers. Each layer protects the one below it.
- Clear Coat: This is the top layer. It is clear and shiny. It protects the color paint. Most light scratches are in this layer. You can often remove pet nail scratches from clear coat easily.
- Base Coat (Color Paint): This layer gives your car its color. If a scratch goes through the clear coat, it hits this layer. You will see the color is gone.
- Primer: This layer is under the base coat. It helps the paint stick. It is usually gray, white, or red. If you see this color, the scratch is deep.
- Metal Body: This is the car’s body. If you see bare metal, the scratch is very deep. This needs more serious repair.
Types of Dog Scratches
Dog nails can cause different kinds of damage.
- Light Scratches: These are just in the clear coat. You can usually fix these with simple polishing. They look like faint lines. You might only see them in certain lights.
- Medium Scratches: These go through the clear coat. They reach the color layer. You will see the color is gone in the scratch. These need more work. A car scratch repair kit pet damage often works well here.
- Deep Scratches: These go through the clear coat and color. They hit the primer or even the bare metal. These are serious. They might need a professional fix. Deep dog scratches car paint fix can be hard to do perfectly yourself.
Checking the Damage Level
It is very important to check how bad the scratch is. This tells you what tools you need. It also tells you how much work it will take.
The Fingernail Test
This is an easy way to check scratch depth.
- Clean the scratch area well. Use soap and water. Dry it with a clean cloth.
- Run your fingernail gently across the scratch.
- If your nail does not catch: The scratch is likely light. It is in the clear coat. You can probably polish it out.
- If your nail catches a little: The scratch is medium. It has gone through the clear coat. You might need a scratch repair kit.
- If your nail catches a lot and drags: The scratch is deep. It has gone past the color. You might need a professional.
Looking at the Scratch Closely
Use good light to see the scratch. You can use a flashlight.
- Is it just a white line? This often means it’s light. The clear coat is scratched. The white is light bouncing off the rough clear coat.
- Do you see a different color? If you see gray, white, or red (primer), it’s deep. If you see the original car color is missing, it’s medium.
- Do you see bare metal? This means the scratch is very deep. It needs urgent care to stop rust.
What You Need for DIY Removal
Having the right tools makes the job easier. For DIY dog scratch removal car exterior, you will need a few key items. Some are for cleaning. Some are for the repair itself.
Essential Cleaning Supplies
Before any repair, clean the area. This stops dirt from scratching more.
- Car Wash Soap: Use a soap made for cars.
- Two Buckets: One for soapy water, one for rinse water. This keeps your sponge clean.
- Microfiber Wash Mitts: Soft mitts prevent new scratches.
- Microfiber Drying Towels: Soft towels to dry the car without leaving marks.
- Rubbing Alcohol or Isopropyl Alcohol (IPA): For final cleaning before repair. It removes oils and waxes.
For Light Scratches (Clear Coat Only)
These tools are for buffing dog scratches off car.
- Polishing Compound (Light Abrasive): This product helps to smooth out the clear coat. It is also called “scratch remover.” Look for one made for clear coat marks.
- Applicator Pads: Foam pads are good for applying compounds.
- Microfiber Buffing Towels: Soft, clean towels for buffing away product haze.
- Detailing Clay Bar (Optional but Recommended): This removes embedded dirt. Use it before polishing.
- Clay Lubricant (or Car Wash Solution): Needed with the clay bar.
For Medium Scratches (Through Clear Coat)
These tools are for when the scratch is a bit deeper. A car scratch repair kit pet damage often has these items.
- Scratch Repair Kit: Many brands offer kits. They often include a compound, applicator, and sometimes a clear coat pen. Look for the best car scratch remover for dog nails.
- Higher Abrasive Compound (Cutting Compound): Stronger than polishing compound. It removes more clear coat to level the scratch.
- Touch-Up Paint (Matching Your Car’s Color Code): If the color layer is damaged. Get this from your car dealer or auto parts store. Make sure the color code matches exactly.
- Clear Coat Pen or Brush: For applying a new layer of clear coat.
For Deep Scratches (Beyond Color Coat)
These tools are for deep dog scratches car paint fix. These are harder to do yourself.
- Primer Pen/Bottle: To apply before color if the scratch hits metal.
- Body Filler (Very Deep Scratches to Metal): For dents or very wide, deep marks. This is more advanced.
- Sandpaper (Fine Grits: 2000, 3000 grit): For leveling a new clear coat or touch-up paint. This needs extreme care.
- Orbital Polisher (Optional but Recommended for Large Areas): For faster and more even buffing. Using one requires practice.
Here is a simple table of tools based on scratch depth:
| Scratch Depth | Recommended Tools |
|---|---|
| Light (Clear Coat) | Car Wash Soap, Microfiber Towels, Polishing Compound, Applicator Pads, Buffing Microfiber |
| Medium (Color Coat) | All above, plus: Scratch Repair Kit, Higher Abrasive Compound, Touch-Up Paint, Clear Coat Pen |
| Deep (Primer/Metal) | All above, plus: Primer, Very Fine Sandpaper (2000-3000 grit), Orbital Polisher (Optional) |
DIY Steps for Light Scratches
This is for remove pet nail scratches from clear coat and buffing dog scratches off car. This is the easiest repair.
h4 Initial Cleaning
- Wash the Car: Use car wash soap and two buckets. Wash the entire car. This removes loose dirt. Focus on the scratch area.
- Rinse and Dry: Rinse all soap off the car. Dry it completely with a clean microfiber towel.
- Detailing Clay (Optional but Recommended): For a super clean surface, use a clay bar. Spray the clay lubricant on the car. Gently rub the clay bar over the area. This lifts tiny bits of dirt you cannot see. Fold the clay often to expose a clean side.
- Final Clean: Wipe the scratch area with rubbing alcohol. This removes any wax or oil. Let it dry fully.
Polishing the Scratch Away
This is where the magic happens for polishing pet scratches from vehicle.
- Apply Compound: Put a small amount of polishing compound onto an applicator pad.
- Rub Gently: Rub the compound onto the scratch. Use small, overlapping circles. Use light to medium pressure. Do this for about 30-60 seconds.
- Check Your Work: Use a clean microfiber towel to wipe away the compound haze. Look at the scratch. Has it faded? Is it gone?
- Repeat if Needed: If the scratch is still there but looks better, repeat steps 1-3. Do not press too hard. You can remove too much clear coat. Do this a few times, checking often.
- Final Buff: Once the scratch is gone or much better, use a clean microfiber towel to buff the area to a shine.
DIY Steps for Medium Scratches
These steps apply when car scratch repair kit pet damage is needed. This means the scratch went through the clear coat and into the color layer.
Prepping for Repair
Follow the same cleaning steps as for light scratches. A perfectly clean surface is key.
- Wash, Rinse, Dry: Clean the car and the scratch area very well.
- Clay and Alcohol Prep: Use a clay bar if you have one. Clean with rubbing alcohol.
Applying the Compound
For medium scratches, you might need a more abrasive compound.
- Use a Stronger Compound: Apply a “cutting” or “scratch remover” compound. Put a small amount on an applicator pad.
- Work the Compound: Rub it onto the scratch area with firm, even pressure. Use small, circular motions. Work only in a small area around the scratch.
- Check Progress: Wipe away the compound with a clean microfiber towel. Check if the scratch is less visible. The goal here is to level the clear coat around the scratch. This helps to hide the color damage.
- Repeat (Carefully): Repeat if needed. Be very careful not to overdo it. You are removing clear coat. Stop when the scratch is much less noticeable. The goal is to make the damaged color less obvious.
Using Touch-Up Paint (If Color is Gone)
If the scratch shows missing color, you need touch-up paint.
- Clean Area Again: Wipe the area with rubbing alcohol one last time. Let it dry.
- Apply Touch-Up Paint:
- Shake the touch-up paint bottle well.
- Use the small brush that comes with the paint. Or use a very fine artist’s brush.
- Apply a very thin coat of paint only to the scratch line. Do not go outside the line.
- Let this first coat dry completely. This can take 15-30 minutes, or longer depending on the product. Check the product instructions.
- Apply a second thin coat if needed. Build up the paint slowly. Do not put on one thick coat. It will look bad.
- Allow the paint to cure fully. This means it hardens. This can take 24 hours or more. Follow the product’s directions.
Applying Clear Coat
After the color paint is dry, you need to add a new clear coat. This protects the new paint.
- Apply Clear Coat Pen/Brush: Use a clear coat pen or bottle. Apply a very thin layer directly over the touch-up paint. Make sure it covers the new paint.
- Let it Dry: Allow the clear coat to dry completely. This can take several hours or even a day. Again, follow product instructions. You might need a second coat.
Leveling and Polishing the New Clear Coat
This step is very important to make the repair blend in. This involves polishing pet scratches from vehicle for a smooth finish.
- Wet Sanding (Advanced): If your new clear coat is bumpy, you can gently wet sand it. This step is risky. Only do it if you are confident.
- Get very fine grit sandpaper (2000 or 3000 grit). Soak it in water for 15 minutes.
- Keep the area wet with a spray bottle. Gently sand the raised clear coat. Use very light pressure. Move in straight lines.
- Check often. Stop as soon as the area feels smooth and level with the surrounding paint. Do NOT sand through the new clear coat.
- Final Polish: After wet sanding (or if the clear coat dried smooth), apply a polishing compound to the area. Use an applicator pad. Rub in small circles. This removes any haze from sanding and brings back the shine.
- Buff to Shine: Use a clean microfiber towel to buff the area until it shines.
When to Call a Professional
Sometimes, DIY is not the best choice. For deep dog scratches car paint fix or extensive auto detailing dog claw marks, a professional might be necessary.
Reasons to Seek Professional Help
- Very Deep Scratches: If you see primer or bare metal. These scratches can rust. A professional can fix them properly. They have the right tools and skills.
- Large Areas of Damage: If your dog scratched a big part of your car. Fixing large areas yourself is very time-consuming. It is also hard to get a uniform look.
- You Feel Unsure: If you are not confident in your skills, it is best to get help. You could make the damage worse.
- Show Car Finish Needed: If you want a perfect, like-new finish, a pro is the way to go. They have specialized equipment and experience.
- Rust Prevention: If the scratch exposes metal, rust can start quickly. Pros can seal and paint the area to prevent rust.
What a Professional Does
Professionals use advanced methods and tools.
- Sanding: They use special sanders and grits to level the surface.
- Paint Matching: They have tools to match your car’s paint color exactly.
- Spray Painting: They use professional spray guns for even paint application.
- Clear Coat Application: They apply a durable clear coat that lasts.
- Buffing and Polishing: They use power buffers to get a high-gloss finish.
- Paint Protection Film (PPF): They can apply clear film to protect against future scratches.
How to Prevent Dog Scratches on Car
Prevention is always better than repair. Here are ways how to prevent dog scratches on car.
Training and Behavior
- Teach Your Dog Not to Jump: Train your dog not to jump on the car. This is key. Use treats and praise for good behavior.
- Use Commands: Teach “wait” or “stay” when near the car.
- Nail Trimming: Keep your dog’s nails trimmed short. This is perhaps the most important step. Long nails cause more damage.
- Trim nails every 2-4 weeks.
- Use dog nail clippers or a dremel tool.
- If unsure, ask a vet or groomer to show you.
- Nail Caps: Consider soft plastic caps for your dog’s nails. These are glued on and protect surfaces. They fall off as nails grow.
Car Protection Measures
- Paw Protectors: Use car seat covers. These protect the back seats and doors.
- Window Guards: If your dog likes to put paws on windows, use window covers. These are often mesh.
- Door Protectors: You can buy guards that stick to your car doors. They stop claws from scratching.
- Ramps or Steps: If your dog jumps into the car, use a ramp. This helps older or bigger dogs too. It stops them from using claws to climb in.
- Cargo Area Liners: For the trunk or cargo space, use a tough liner. This protects against scratches.
- Containment: Use a dog crate or car harness. This keeps your dog safe and prevents movement that can cause scratches.
- Park Smart: Park away from hedges or bushes that might brush against your dog when they exit.
- Wipe Paws: Before your dog gets in, wipe their paws. This removes dirt and small rocks that can scratch.
Maintaining Your Car’s Finish After Repair
Once you have fixed the scratches, keep your car looking good.
Regular Washing
- Wash your car often. Use the two-bucket method.
- Use soft microfiber wash mitts and towels.
- This keeps dirt from building up. Dirt can cause new scratches.
Waxing and Sealants
- Apply car wax or a paint sealant every few months.
- This adds a layer of protection over your clear coat.
- It makes it harder for new light scratches to form.
- It also makes your car shine more.
Immediate Attention to New Marks
- If you see a new scratch, clean it and check it right away.
- Fixing light marks early saves you more work later.
Frequently Asked Questions (FAQ)
Can I use toothpaste to remove dog scratches from my car?
Some people suggest using toothpaste for very light scratches. It has a mild abrasive. But it’s not made for car paint. It might not work well. It could also leave dull spots if not used right. It’s safer to use a product made for car paint, like a polishing compound.
How much does it cost to get dog scratches professionally removed?
The cost varies a lot. It depends on how deep the scratches are. It also depends on how many there are. Location and the shop’s rates also play a role.
* Light scratches: A few hundred dollars for detailing and polishing.
* Medium to deep scratches: Can be hundreds or even over a thousand dollars for paint repair.
It is best to get a few quotes from local auto detailing shops.
Is a car scratch repair pen good for dog scratches?
A car scratch repair pen can work for thin, medium scratches. These pens usually have clear coat or a mix of clear coat and color. They help fill in the scratch line. For wider scratches, they might not look perfect. For very deep ones, they might not be enough. They are a good DIY tool for specific types of damage.
Can dog scratches cause rust on my car?
Yes, if a dog scratch goes through all the paint layers and exposes the bare metal, it can lead to rust. Metal exposed to air and moisture will rust over time. That is why deep scratches need to be fixed quickly. Even if you do a quick DIY fix, it helps protect the metal.
What is the best car scratch remover for dog nails?
The “best” product depends on the scratch depth.
* For light clear coat scratches, a good quality polishing compound (like Meguiar’s Ultimate Compound, Chemical Guys VSS, or similar) works well.
* For medium scratches, a dedicated scratch repair kit that includes touch-up paint and clear coat (like from your car manufacturer, or brands like Dupli-Color) is often best.
Always choose products designed for automotive paint.
How long does DIY scratch repair last?
If done correctly, a DIY repair for light to medium scratches can last a long time. For light scratches that are buffed out, the fix is permanent. For touch-up paint, its life depends on how well it was applied and protected. Regular waxing helps. However, a DIY repair might not be as durable as a professional paint job. A new scratch in the same spot will need fixing again.
Fixing dog scratches on your car is a common problem for pet owners. By knowing the scratch type and using the right steps, you can make your car look great again. Remember, prevention is key. Keeping your dog’s nails trimmed and using car protectors can save you a lot of time and money in the long run.